
Welcome to our comprehensive expert guide, “The Ultimate Reference for Managing Users in Linux.” If you’re new to the world of Linux or a seasoned administrator looking to deepen your knowledge, you’ve come to the right place. User management is a fundamental aspect of Linux system administration, and understanding how to create, modify, and control user accounts is crucial for maintaining a secure and efficient Linux environment.

A. Useradd :-
How to Add a New User in Linux?
To add/create a new user, you’ve to follow the command ‘sudo useradd‘ or ‘sudo adduser‘ with ‘username‘. The ‘username‘ is a user login name, that is used by a user to login into the system.
Only one user can be added and that username must be unique (different from other usernames that already exist on the system).
For example, to add a new user called ‘user1‘, use the following command.
ubuntu@RushiInfotech:/$ sudo adduser user1
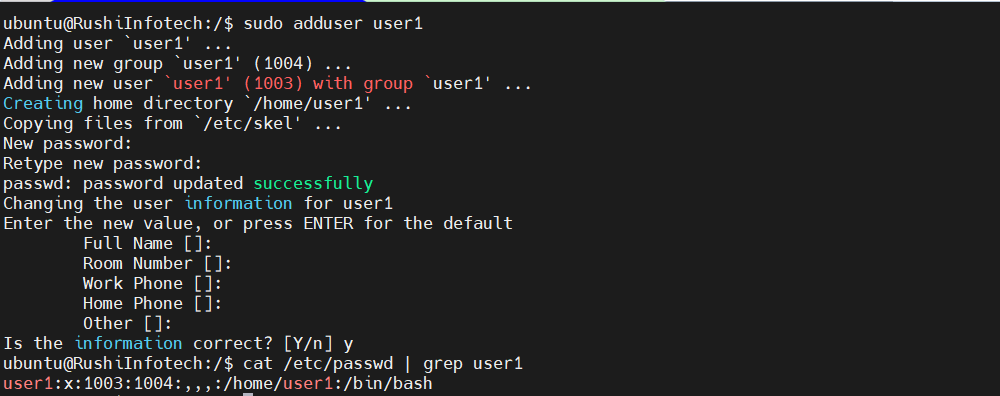
Once a new user is created, its entry is automatically added to the ‘cat /etc/passwd‘ file. The file is used to store the user’s information and the entry should be.
ubuntu@RushiInfotech:/$ cat /etc/passwd | grep user1

The above entry contains a set of seven colon-separated fields, each field has its own meaning. Let’s see what are these fields:
- Username: User login name used to login into the system. It should be between 1 to 32 characters long.
- Password: User password (or x character) stored in /etc/shadow file in an encrypted format.
- User ID (UID): Every user must have a User ID (UID) User Identification Number. By default, UID 0 is reserved for the root user and UIDs ranging from 1-99 are reserved for other predefined accounts. Further UIDs ranging from 100-999 are reserved for system accounts and groups.
- Group ID (GID): The primary Group ID (GID) Group Identification Number stored in the /etc/group file.
- User Info: This field is optional and allows you to define extra information about the user. For example, the user’s full name. This field is filled by the ‘finger’ command.
- Home Directory: The absolute location of the user’s home directory.
- Shell: The absolute location of a user’s shell i.e. /bin/bash.
Create a User with a Different Home Directory
By default ‘sudo useradd‘ command creates a user’s home directory under /home directory with a username. Thus, for example, we’ve seen above the default home directory for the user ‘account‘ is ‘/home/user1‘
However, this action can be changed by using the ‘-d‘ option along with the location of the new home directory (i.e. /data/projects). For example, the following command will create a user ‘user2‘ with a home directory ‘/data/projects‘.
ubuntu@RushiInfotech:/$ sudo useradd -d /data/projects user2

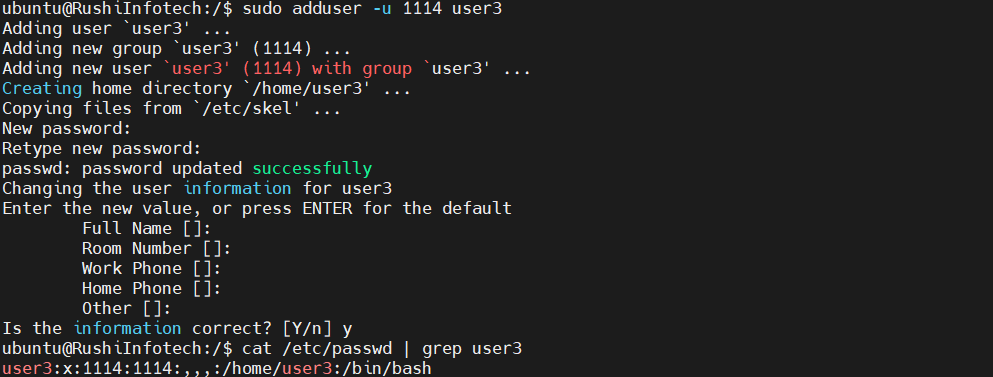
Create a User with a Specific User ID
In Linux, every user has their own UID (Unique Identification Number). By default, whenever we create a new user account in Linux, it assigns userid 500, 501, 502, and so on…
But, we can create users with custom userid with the ‘-u‘ option. For example, the following command will create a user ‘user3‘ with custom userid ‘1114‘.
ubuntu@RushiInfotech:/$ sudo adduser -u 1114 user3
ubuntu@RushiInfotech:/$ cat /etc/passwd | grep user3
How to create a Group?
ubuntu@RushiInfotech:/$ sudo addgroup group1
To create a group we should specify the “sudo addgroup” with “groupname” eg. “sudo addgroup group1.”
Create a User with a Specific Group ID
Similarly, every user has their own GID (Group Identifier). We can create users with specific group IDs as well with the -g option.
Here in this example, we will add a user ‘user4‘ with a specific UID and GID simultaneously with the help of ‘-u‘ and ‘-g‘ options.
ubuntu@RushiInfotech:/$ sudo useradd -u 1115 -g group1 user4
ubuntu@RushiInfotech:/$ cat /etc/passwd | grep user4

Add a User without Home Directory
In some situations, where we don’t want to assign home directories for a user, due to security reasons. In such a situation, when a user logs into a system that has just restarted, its home directory will be root. When such a user uses the su command, its login directory will be the previous user’s home directory.
To create users without their home directories, ‘-M‘ is used. For example, the following command will create a user ‘user5‘ without a home directory.
ubuntu@RushiInfotech:/$ sudo useradd -M user5
ubuntu@RushiInfotech:/$ ls -l /home/user5

Create a User with an Account Expiry Date
By default, when we add user’s with the ‘useradd‘ command user account never get expires i.e their expiry date is set to 0 (which means never expired).
However, we can set the expiry date using the ‘-e‘ option, which sets the date in YYYY-MM-DD format. This is helpful for creating temporary accounts for a specific period of time.
Here in this example, we create a user ‘user6‘ with an account expiry date i.e. 15th September 2023 in YYYY-MM-DD format.
Next, verify the age of the account and password with the ‘chage‘ command for user ‘user6‘ after setting the account expiry date.
ubuntu@RushiInfotech:/$ sudo useradd -e 2023-09-15 user6
ubuntu@RushiInfotech:/$ sudo chage -l user6

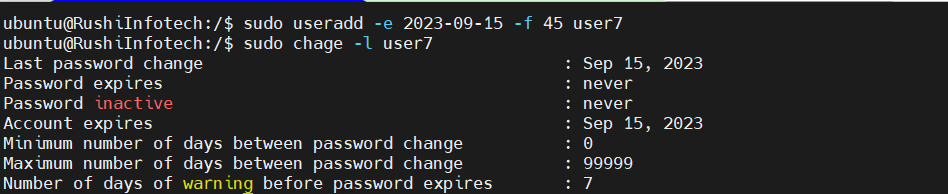
Create a User with Password Expiry Date
The ‘-f‘ argument is used to define the number of days after a password expires. A value of 0 inactive the user account as soon as the password has expired. By default, the password expiry value set to -1 means never expires.
Here in this example, we will set an account password expiry date i.e. 45 days on a user ‘user7‘ using ‘-e‘ and ‘-f‘ options.
ubuntu@RushiInfotech:/$ sudo useradd -e 2023-09-15 -f 45 user7
ubuntu@RushiInfotech:/$ sudo chage -l user7
Add a User with Custom Comments
The ‘-c‘ option allows you to add custom comments, such as the user’s full name, phone number, etc to /etc/passwd file. The comment can be added as a single line without any spaces.
For example, the following command will add a user ‘user‘ and would insert that user’s full name, user surname, into the comment field.
ubuntu@RushiInfotech:/$ sudo useradd -c "user surname" username
ubuntu@RushiInfotech:/$ tail -1 /etc/passwd

Create a User Login Shell in Linux
Sometimes, we add users who have nothing to do with the login shell or sometimes we require to assign difference shell to our users. We can assign different login shells to each user with the ‘-s‘ option.
Here in this example, will add a user ‘user8‘ without a login shell i.e. ‘/sbin/nologin‘ shell.
ubuntu@RushiInfotech:/$ sudo useradd -s /sbin/nologin user8
ubuntu@RushiInfotech:/$ tail -1 /etc/passwd

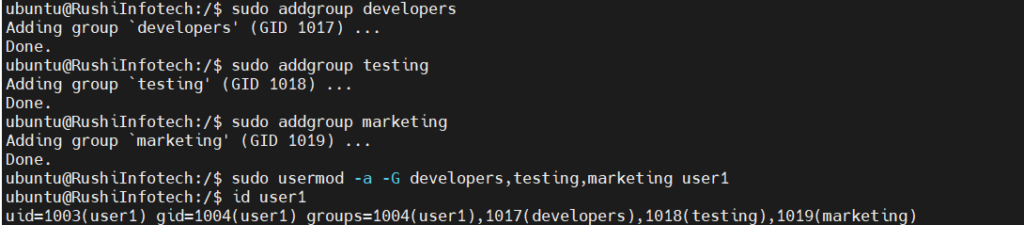
Add a User to Multiple Groups.
The ‘-G‘ option is used to add a user to additional groups. Each group name is separated by a comma, with no intervening spaces.
Here in this example, we are adding a user ‘user1‘ into multiple groups like developers, testing and marketing.
ubuntu@RushiInfotech:/$ sudo addgroup developers
ubuntu@RushiInfotech:/$ sudo addgroup testing
ubuntu@RushiInfotech:/$ sudo addgroup marketing
ubuntu@RushiInfotech:/$ sudo usermod -a -G developers,testing,marketing user1
ubuntu@RushiInfotech:/$ id user1
uid=1003(user1) gid=1004(user1) groups=1004(user1),1017(developers),1018(testing),1019(marketing)
Delete a user in linux.
To delete a user we just have to write the command “sudo deluser username ” .
For example – In the below code, the user1 is name of the user created before.
sudo deluser user1

B. Usermod:-
After creating user accounts, in some scenarios where we need to change the attributes of an existing user such as, change user’s home directory, login name, login shell, password expiry date, etc, where in such case ‘usermod’ command is used.
When we execute ‘usermod‘ command in terminal, the following files are used and affected.
- /etc/passwd – User account information.
- /etc/shadow – Secure account information.
- /etc/group – Group account information.
- /etc/gshadow – Secure group account information.
- /etc/login.defs – Shadow password suite configuration.
Basic syntax of command is:
usermod [options] username
The ‘usermod‘ command is simple to use with lots of options to make changes to an existing user. Let us see how to use usermod command by modifying some existing users in Linux box with the help of following options.
- -c = We can add comment field for the useraccount.
- -d = To modify the directory for any existing user account.
- -e = Using this option we can make the account expiry in specific period.
- -g = Change the primary group for a User.
- -G = To add a supplementary groups.
- -a = To add anyone of the group to a secondary group.
- -l = To change the login name from tecmint to tecmint_admin.
- -L = To lock the user account. This will lock the password so we can’t use the account.
- -m = moving the contents of the home directory from existing home dir to new dir.
- -p = To Use un-encrypted password for the new password. (NOT Secured).
- -s = Create a Specified shell for new accounts.
- -u = Used to Assigned UID for the user account between 0 to 999.
- -U = To unlock the user accounts. This will remove the password lock and allow us to use the user account.
Adding Information to User Account
The ‘-c‘ option is used to set a brief comment (information) about the user account. For example, let’s add information on ‘user1‘ user, using the following command.
ubuntu@RushiInfotech:/$ sudo usermod -c "Welcome to RushiInfotech" user2
ubuntu@RushiInfotech:/$  grep -E --color 'user2' /etc/passwd

Change User Home Directory
In the above step we can see that our home directory is under /home/user2/, If we need to change it to some other directory we can change it using -d option with usermod command.
For example, I want to change our home directory to /var/www/, but before changing, let’s check the current home directory of a user, using the following command.
ubuntu@RushiInfotech:/$ cd /home
ubuntu@RushiInfotech:/home$  grep -E --color 'user2' /etc/passwd

Now, change home directory from /home/tecmint to /var/www/ and confirm the home director after changing.

Set User Account Expiry Date
The option ‘-e‘ is used to set expiry date on a user account with the date format YYYY-MM-DD. Before, setting up an expiry date on a user, let’s first check the current account expiry status using the ‘chage‘ (change user password expiry information) command.

Change User Primary Group
To set or change a user primary group, we use option ‘-g‘ with usermod command. Before, changing user primary group, first make sure to check the current group for the user developer.
Now, set the softwaredeveloper group as a primary group to user developer and confirm the changes.
ubuntu@RushiInfotech:/$ sudo usermod -g softwaredeveloper developer
ubuntu@RushiInfotech:/$ id developer

Adding Group to an Existing User
If you want to add a new group called ‘testing‘ to ‘tester‘ user, you can use option ‘-G‘ with usermod command as shown below.
ubuntu@RushiInfotech:/$ sudo  usermod -G testing tester
ubuntu@RushiInfotech:/$ id tester
uid=1014(tester) gid=1023(tester) groups=1023(tester),1018(testing)

Change User Login Name
To change any existing user login name, we can use ‘-l‘ (new login) option. In the example below, we changing login name rushiinfotech to rushiinfotech_admin. So the username rushiinfotech has been renamed with the new name rushiinfotech_admin.
ubuntu@RushiInfotech:~$ sudo usermod -l rushiinfotech_admin  rushiinfotech
ubuntu@RushiInfotech:~$ id rushiinfotech_admin

Lock User Account
To Lock any system user account, we can use ‘-L‘ (lock) option, After the account is locked we can’t login by using the password and you will see a ! added before the encrypted password in /etc/shadow file, means password disabled.
ubuntu@RushiInfotech:~$ sudo usermod -L user1
ubuntu@RushiInfotech:~$ grep -E --color 'user1' cat /etc/shadow

Unlock User Account
The ‘-U‘ option is used to unlock any locked user, this will remove the ! before the encrypted password.
ubuntu@RushiInfotech:~$ grep -E --color 'user1' /etc/shadow
user1:!$6$Dlbfry7YmGOMHH7m$gGnmoH5K9EaSRQzsYFBlUrwDff1Y3FGZTehXI6YOtvaHULoQZ75veJ5SXSCTHfMV/lb8AtpJG2wXuo5.gjmaX1:19621:0:99999:7:::
ubuntu@RushiInfotech:~$ sudo usermod -U user1
ubuntu@RushiInfotech:~$ grep -E --color 'user1' /etc/shadow
user1:$6$Dlbfry7YmGOMHH7m$gGnmoH5K9EaSRQzsYFBlUrwDff1Y3FGZTehXI6YOtvaHULoQZ75veJ5SXSCTHfMV/lb8AtpJG2wXuo5.gjmaX1:19621:0:99999:7:::

Conclusion
This guide has comprehensively covered the essential aspects of managing user commands in the Linux operating system. You have acquired the knowledge needed to create, modify, and delete user accounts effectively. Understanding the nuances of user attributes, home directories, and login shells empowers you to tailor user accounts to suit your system’s requirements precisely. By following best practices and security considerations, you are well-prepared to manage user accounts confidently, ensuring the stability and security .
Reference:
For reference of Linux, Please visit official website.
Any queries pls contact @Rushi-InfoTech

![Java 18 Installation on Ubuntu 22.04 LTS [5 Steps]](https://rushiinfotech.in/wp-content/uploads/2023/09/Java-18-Installation-on-Ubuntu-22.04-LTS.png)