
In this article, we’ll walk you through the steps of installing Tomcat 10 on Ubuntu 22.04. We’ll also discuss some important concepts related to the installation, such as setting up the environment, downloading and installing the necessary packages, and configuring the Tomcat instance.

What is Apache Tomcat?
Apache Tomcat is an open-source application server and servlet container that provides a platform for running Java web applications. It supports the Java Servlet and JavaServer Pages (JSP) technologies, allowing developers to deploy dynamic web content. Tomcat is widely used for hosting Java-based web applications and is known for its scalability and reliability. It is a critical component in the Java web development ecosystem.
What is Java Servlet And JavaServer Pages?
Java Servlet: Java Servlets are Java-based programs that run on a web server to handle dynamic content generation and manage client-server communication. They receive and respond to HTTP requests, making them suitable for processing form data, managing sessions, and interacting with databases to create dynamic web applications.
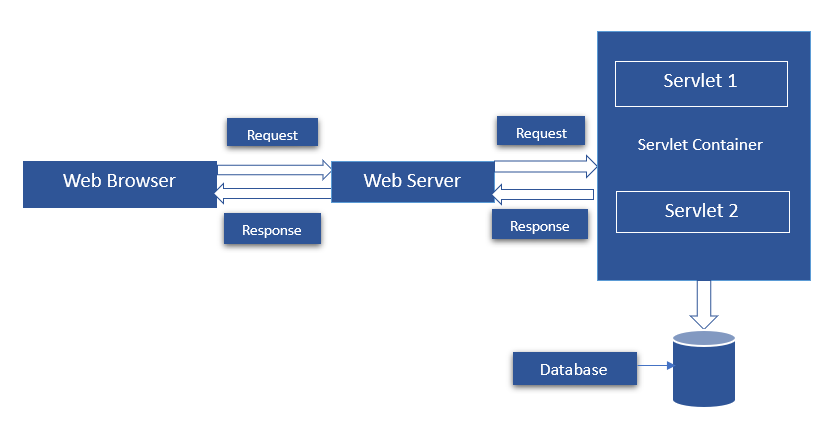
JavaServer Pages (JSP): JSP is a technology that allows developers to embed Java code within HTML pages. It simplifies the creation of dynamic web content by enabling the inclusion of Java logic for data processing and presentation. JSP files are compiled into servlets, making them a powerful tool for building dynamic web applications using Java.

Difference Between Apache Web Server and Apache Tomcat Server.
| Aspect | Apache Web Server (HTTPD) | Apache Tomcat |
|---|---|---|
| Purpose | Web Server for serving static content (HTML, images, etc.) and handling HTTP requests. | Application Server for executing Java-based web applications, handling dynamic content, and serving Java Servlets and JSPs. |
| Primary Use Cases | Hosting static websites, proxying requests to other application servers or web applications. | Running Java web applications, hosting servlets and JSPs, and handling dynamic content generation. |
| Supported Technologies | Handles HTTP/HTTPS requests. | Supports Java Servlets, JavaServer Pages (JSP), and other Java-based technologies. |
| Static vs. Dynamic Content | Primarily serves static content. | Specialized for serving dynamic content generated by Java-based applications. |
| Configuration | Uses a configuration file (httpd.conf) for settings and virtual hosts. | Configuration is done through server.xml and context.xml files. |
| Scalability | Efficient at serving large numbers of static requests and load balancing. | Suited for handling Java-based dynamic content, including database interactions. |
| Port | Listens on port 80 (HTTP) and 443 (HTTPS) by default. | Listens on port 8080 by default, which can be configured for HTTP or HTTPS. |
| Deployment | Requires web applications to be deployed separately on an application server. | Bundles the application server and handles deployment of Java applications. |
| Supported Languages | Primarily serves static files, but can be extended with modules to support various scripting languages. | Specifically designed for Java applications. |
| Examples of Use | Serving HTML, CSS, JavaScript, and other static files for websites. | Hosting Java-based web applications, such as e-commerce sites or web portals. |
| Popular Modules and Extensions | mod_rewrite, mod_ssl, mod_proxy. | No modules, but supports web application-specific configuration and context settings. |
Step#1 : Update System Packages
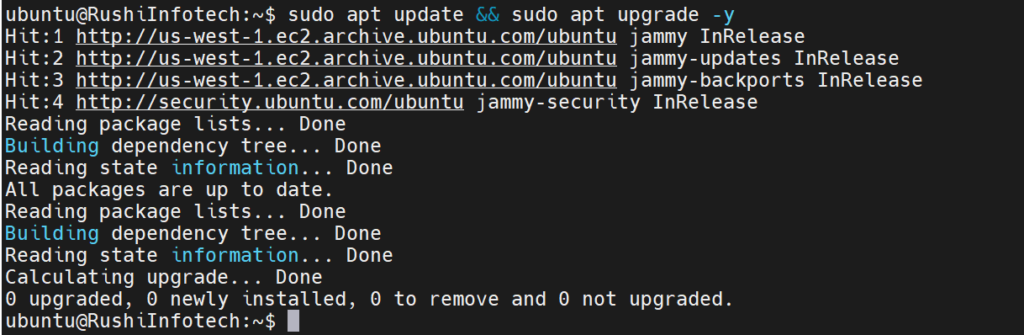
It’s always a good idea to update the package lists for upgrades and new installations. Open your terminal, and enter the following command:
ubuntu@RushiInfotech:~$ sudo apt update && sudo apt upgrade -y
Step#2 : Install OpenJDK- Java
As we know the key requirement to install Tomcat is Java, thus first we set up an open-source Java Development kit on Ubuntu 22.04 LTS using the terminal.
The OpenJDK packages are available in the default base repository of Ubuntu 22.04 LTS Jammy, thus use the given command to install it. The java version supported is 8 or above. Here we are getting Java 11.
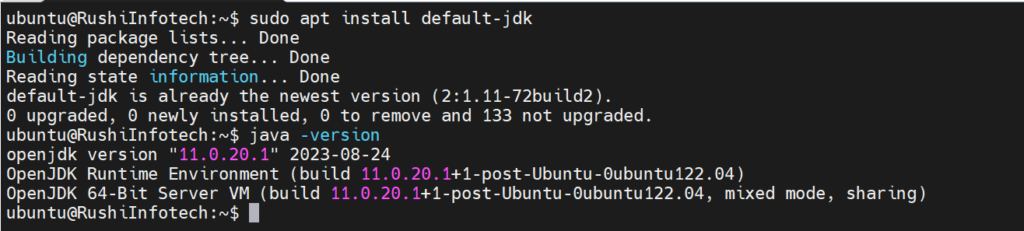
ubuntu@RushiInfotech:~$ sudo apt install default-jdk
To check and confirm, that Java has been installed successfully, see its version
ubuntu@RushiInfotech:~$ java -version
Step#3 : Download Apache Tomcat
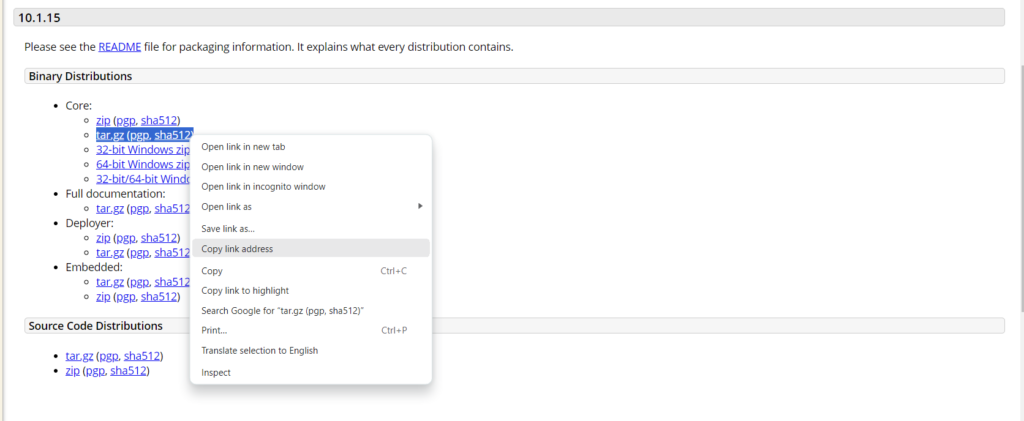
You can get the latest version directly from the official webpage of Tomcat. If you are using a GUI system then can download it by simply clicking on the Zip or Tar file. However, those who are accessing a remote server with CLI via SSH can use the wget. Simply, right-click on the Tart.gz file and copy the link address. After that type wget on your terminal and paste the link.wget paste-link

ubuntu@RushiInfotech:~$ sudo wget https://dlcdn.apache.org/tomcat/tomcat-10/v10.1.15/bin/apache-tomcat-10.1.15.tar.gz
Step#4 : Install Apache Tomcat on Ubuntu 22.04
Extract the downloaded file to /opt directory so that we won’t delete it accidentally.
1. Create a directory under /opt to extract files

ubuntu@RushiInfotech:~$ sudo mkdir -p /opt/tomcat
2. Now, extract the downloaded Tomcat Tar file into the created directory.

ubuntu@RushiInfotech:~$ sudo tar xzvf apache-tomcat-*tar.gz -C /opt/tomcat --strip-components=1
3. Create a dedicated user
To ensure the security of the system while testing various web applications, let’s create a non-root user that has only access to the created /opt/tomcat folder.
ubuntu@RushiInfotech:~$ sudo groupadd tomcat
ubuntu@RushiInfotech:~$ sudo useradd -s /bin/false -g tomcat -d /opt/tomcat tomcat

Step#5 : Assigning Tomcat user permissions
Well, we already have set up the files that require using this open-source web application server, now let’s assign the permission of the folder to the user we have created above for it.

ubuntu@RushiInfotech:~$ sudo chown -R tomcat: /opt/tomcat
ubuntu@RushiInfotech:~$ sudo sh -c 'chmod +x /opt/tomcat/bin/*.sh'
Step#6 : Create a Systemd service file
By default, we won’t have a Systemd unit file for Tomcat to run it in the background and to easily stop, start and enable its services. Thus, we create one, so that we could manage it without any issues.
Create Systemd unit file

ubuntu@RushiInfotech:~$ sudo nano /etc/systemd/system/tomcat.service
Paste the following block of code in it-
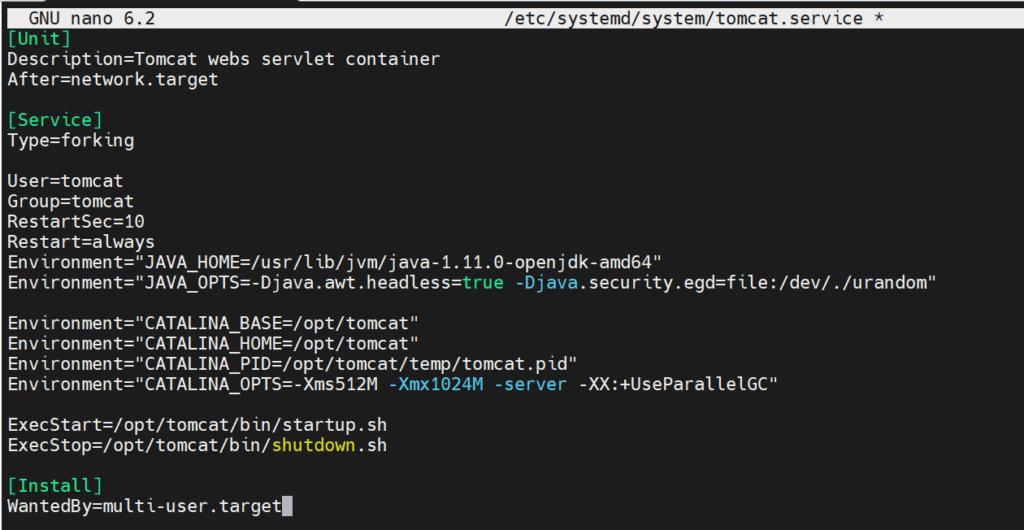
[Unit]
Description=Tomcat webs servlet container
After=network.target

[Service]
Type=forking

User=tomcat
Group=tomcat
RestartSec=10
Restart=always
Environment="JAVA_HOME=/usr/lib/jvm/java-1.11.0-openjdk-amd64"
Environment="JAVA_OPTS=-Djava.awt.headless=true -Djava.security.egd=file:/dev/./urandom"

Environment="CATALINA_BASE=/opt/tomcat"
Environment="CATALINA_HOME=/opt/tomcat"
Environment="CATALINA_PID=/opt/tomcat/temp/tomcat.pid"
Environment="CATALINA_OPTS=-Xms512M -Xmx1024M -server -XX:+UseParallelGC"

ExecStart=/opt/tomcat/bin/startup.sh
ExecStop=/opt/tomcat/bin/shutdown.sh

[Install]
WantedBy=multi-user.target
To save the press Ctrl+X, type –Y, and hit the Enter Key.
Note: In the above-given code for creating a systemd file, we have to mention the path of Java. However, the given one in the above code is the default path, still, to confirm the same you can run the below command:

ubuntu@RushiInfotech:~$ sudo update-java-alternatives -l
Step#7 : Enable and start Tomcat service on Ubuntu 22.04
Finally, we have plugged in all the necessary things to start the Tomcat service in the background on Ubuntu 22.04 LTS Jammy. Let’s enable and run the same.

ubuntu@RushiInfotech:~$ sudo systemctl daemon-reload
ubuntu@RushiInfotech:~$ sudo systemctl start tomcat
ubuntu@RushiInfotech:~$ sudo systemctl enable tomcat
To confirm everything is working normally, check the status of service:

ubuntu@RushiInfotech:~$ sudo systemctl status tomcat --no-pager -l
Step#8 : Add Roles and Admin username and password
This step is important, without performing it we will get an error: “403 Access Denied on Tomcat 10/9/8 error” as we click on “Server Status“, “Manager App” and “Host Manager” links on the Apache Tomcat Web interface.
Edit user configuration file.

ubuntu@RushiInfotech:~$ sudo nano /opt/tomcat/conf/tomcat-users.xml
At the end just before </tomcat-users> tag copy and paste the following lines.
Note– Change the username and password values with whatever you want to set for your Tomcat.

<role rolename="admin"/>
<role rolename="admin-gui"/>
<role rolename="manager"/>
<role rolename="manager-gui"/>

<user username="RushiInfotech" password="Rushi123" roles="admin,admin-gui,manager,manager-gui"/>
Save the file and exit- Ctrl+X, type- Y, and hit the Enter key.
Step#9 : Enable Tomcat and Host Manager Remote access
By default, you won’t be able to access your installed Tomcat Manager sections (web interface) outside the local system. For that, we have to enable it by editing individually the context.xml file available for Tomcat Manager and Host Manager.
For Tomcat Manager’s remote access:
Edit the Context file

ubuntu@RushiInfotech:~$ sudo nano /opt/tomcat/webapps/manager/META-INF/context.xml
In the file, scroll and go to the end and comment out the following block of text-
<Valve className="org.apache.catalina.valves.RemoteAddrValve"
allow="127\.\d+\.\d+\.\d+|::1|0:0:0:0:0:0:0:1" />
Just add <!-- at the beginning and --> in the end, after that, this will look something like this-

<!-- <Valve className="org.apache.catalina.valves.RemoteAddrValve"
allow="127\.\d+\.\d+\.\d+|::1|0:0:0:0:0:0:0:1" /> -->
Save the file and exit- Ctrl+X, type- Y, and hit the Enter key.
For Host manager remote access:

ubuntu@RushiInfotech:~$ sudo nano /opt/tomcat/webapps/host-manager/META-INF/context.xml
Just like above, also add <!-- at the beginning and --> at the end of the text given below in the file, after that, this will look like something this-

<!-- <Valve className="org.apache.catalina.valves.RemoteAddrValve"
allow="127\.\d+\.\d+\.\d+|::1|0:0:0:0:0:0:0:1" /> -->
Save the file and exit.
Restart Tomcat service-
ubuntu@RushiInfotech:~$ sudo systemctl restart tomcat
Step#10 : Open port 8080 in Ubuntu 22.04 Firewall
The service to access the web interface via browser is available on port 8080 and to access the same remotely using any other system, we have to allow its outgoing connection in the firewall.

ubuntu@RushiInfotech:~$ sudo ufw allow 8080
Step#11 : Access the Tomcat Web interface
To access the tomcat default page we need to change the security settings of the instance.
Change the Inbound rules in Security of the instance and simply add a rule :
1.Select Type info – Custom TCP
2.Port range –8080
3.Select Source info – Anywhere IPv4

And then Open any browser on the local or remote system and point it to the IP address or domain of the server where you have installed the Apache Tomcat.
For example:
Open any browser on the local or remote system and point it to the IP address or domain of the server where you have installed the Apache Tomcat.
For example:
http://server-ip-addres:8080
or
http://yourdomain.com:8080
Tomcat Server Default page :-

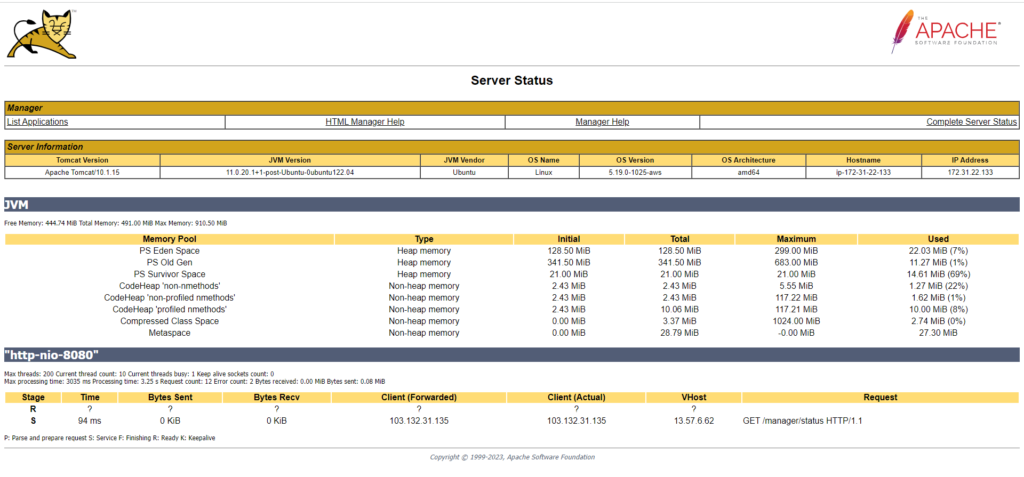
Tomcat Server Status :-
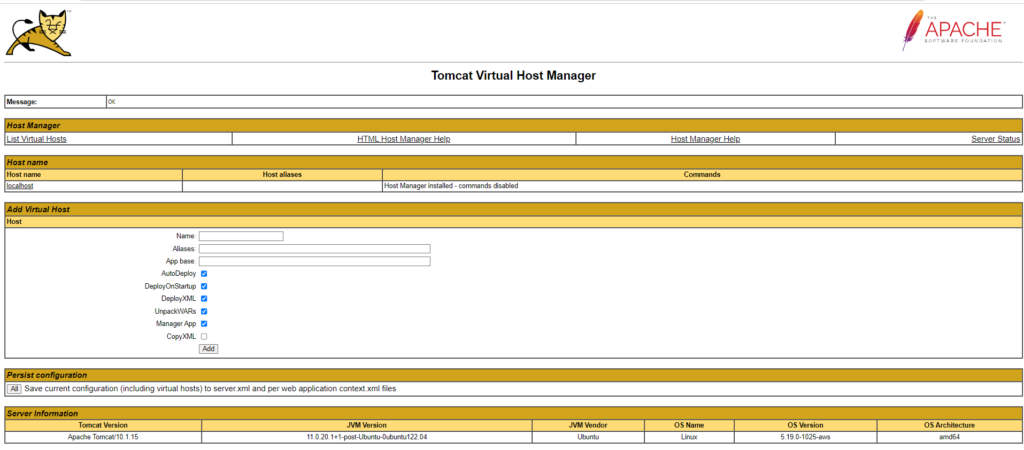
Tomcat Virtual Host Manager :-
Tomcat Web Application Manager :-

Conclusion :-
We have successfully install and configure Tomcat 10 on Ubuntu 22.04 LTS that requires updating the system, installing Java, downloading and configuring Tomcat, and finally starting the server for web application deployment. This process enables you to host Java web applications efficiently on your Ubuntu server.
Reference:-
For reference visit the official website Apache Tomcat
Any queries pls contact us @Rushi Infotech

![Java 18 Installation on Ubuntu 22.04 LTS [5 Steps]](https://rushiinfotech.in/wp-content/uploads/2023/09/Java-18-Installation-on-Ubuntu-22.04-LTS.png)
![Java 18 Installation on Ubuntu 20.04 LTS using curl [5 Steps]](https://rushiinfotech.in/wp-content/uploads/2023/09/Java-18-Installation-on-Ubuntu-22.04-LTS-1.png)
![Java 17 Installation on Ubuntu 22.04 LTS [5 Steps]](https://rushiinfotech.in/wp-content/uploads/2023/09/Add-a-heading.png)